windows手动搭建apache+php+mysql
本地手动搭建apache+php+mysql自启动
系统环境 win10.1803
php下载
Apache一般是isapi的方式选择ThreadSafe版本,对于nginx的是fastcgi选择NonThread Safe版本
我选的ThreadSafe 64位版本:php-7.3.1-Win32-VC15-x64
注意:php和apache的版本要一致(这里都选VC15+64位 版本的)
VC15需要Visual C++ Redistributable for Visual Studio 2017 支持,如果电脑没装请去官网下载 (可以百度下visual studio和vc版本之间的对应关系找对应版本)
(2020-03-01win10系统更新后突然启动不了服务,于是换成了php7.4.3。特别注意:apache,php都是TS-VC15-X64所有扩展如redis和memcache等相应服务都需要一样的制式)
apache下载
https://www.apachelounge.com/download/ (页面左上方可以选择VC版本)
Mysql下载
依次选择点击 downloads-》commonity-》MySQLCommunity Server
这里选择mysql-5.7.24-winx64.zip 下载zip包(这里不下载msi镜像)
先安装apache:
在D盘新建webserver根目录
把apache解压到根目录,命名为apache24
a)打开apache24/conf/httpd.conf文件,把所有${SRVROOT}标记的地方改成当前apache的目录(如:D:/WebServer/Apache24)或直接修改Define SRVROOT "D:/WebServer/Apache24"
b)搜索 :DocumentRoot,添加网站目录,如(D:/Web)
c)搜索:dir_module模块,添加网站默认首页文件,添加index.php
d)搜索:ServerName 去掉注释符号,改为:ServerName localhost:80
e)在apache24/bin目录打开命令窗口执行 .\httpd 开启服务。
f)在D:/Web 目录下新建index.html,在浏览器输入localhost 完成配置
把apache配置为服务:
a)命令行输入:httpd.exe –k install –n "Apache24"
b)把apache添加到系统变量(D:\WebServer\Apache24\bin)
安装php:
在webserver目录新建php73文件夹,并把php包解压到该文件夹
解压后找到php.ini-development(开发环境用)与php.ini-production(生产环境用)
本地环境配置建议使用开发环境版本,将php.ini-development拷贝一份,并重新命名为php.ini
打开php.ini文件,进行以下配置:
a)extension_dir= “ext”,取消注释,这里是指定php扩展库目录的路径,extension_dir 需要指向存放 PHP 扩展库文件的目录。可以是绝对路径(如 "D:/WebServer/php73/ext")或相对路径(如".\ext")*与apache结合不能写相对路径。在 php.ini 文件中要加载的扩展库都必须在 extension_dir 所指定的目录之中
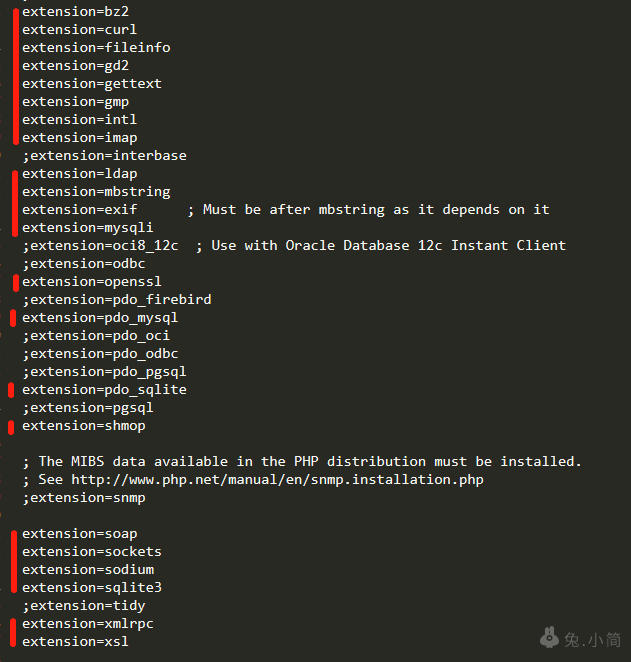
b)开启扩展(把:分号去掉,见图)
c)配置php时区,搜索:date.timezone
去掉注释,修改为date.timezone =PRC即可,PRC代表中华人民共和国,即这里是中国时区
d)搜索以下配置:
doc_root=(服务器文件根目录,可以为空,因为apache配置中配了)
session.save_path = "/tmp"(会话暂存目录保持默认)
e)php配置成功后,我们再回到Apache配置文件httpd.conf中添加配置使Apache支持解析php,找到LoadModule模块在后面添加:
#php7以支持curl
LoadFile "D:/WebServer/php73/libssh2.dll"
#Apache载入php模块
LoadModule php7_module D:/WebServer/php73/php7apache2_4.dll
PHPIniDir D:/WebServer/php73
然后再找到AddType application/x-gzip .gz .tgz在后面(另起一行)添加:
AddType application/x-httpd-php .php .html .htm
URL重写可以通过URL重写隐藏应用的入口文件index.php
=》找到<Directory "D:/Web">下面和<Directory "D:/WebServer/Apache24/cgi-bin">下面的 AllowOverride改成
AllowOverride All
=》找到#LoadModule rewrite_module modules/mod_rewrite.so并打开
LoadModule rewrite_module modules/mod_rewrite.so
安装mysql
在webserver新建mysql文件夹并把mysql包解压到该文件夹
a)在bin目录新建一个my.ini添加如下代码:
[client]
port           =3306
default-character-set=utf8

# Here follows entries for some specificprograms
# The MySQL server

[mysqld]
port           =3306
key_buffer_size = 16M
max_allowed_packet = 1M
sort_buffer_size = 512K
net_buffer_length = 8K
read_buffer_size = 256K
read_rnd_buffer_size = 512K
myisam_sort_buffer_size = 8M
basedir=D:/WebServer/mysql
log-error=D:/WebServer/mysql/log/mysql.log
datadir= D:/WebServer/mysql/data
lc-messages-dir=D:/WebServer/mysql/share
lc-messages=fr_FR
explicit_defaults_for_timestamp = TRUE
skip-federated
server-id  =1
skip-slave-start

[mysqldump]
quick
max_allowed_packet = 128M


[mysql]
no-auto-rehash
# Remove the next comment character if youare not familiar with SQL
#safe-updates


[isamchk]
key_buffer = 20M
sort_buffer_size = 20M
read_buffer = 2M
write_buffer = 2M

[myisamchk]
key_buffer = 20M
sort_buffer_size = 20M
read_buffer = 2M
write_buffer = 2M

[mysqlhotcopy]
interactive-timeout

[mysqld]
port=3306
explicit_defaults_for_timestamp = TRUE
b)然后把mysql添加到系统变量,跟上面apache添加变量一样
c)然后用管理员身份打开cmd输入:
mysqld --initialize-insecure(等一会儿,此时返回mysql目录,我们会发现多了个 data文件夹,里边有许多数据和文件)
d)输入:mysqld –install(安装)
e)继续输入:net start mysql(启动并注册mysql服务)
f)输入: mysql –u root -p(直接进入数据库操作)exit;退出
mysqladmin -u root -p password(设置新密码)
默认没有密码直接回车,之后是设置新密码和重复设置密码
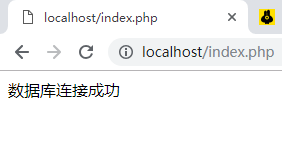
测试连接:
在apache配置好的D:/Web 目录下新建index.php输入以下代码:
$res =mysqli_connect("localhost","root","");
if($res){
		echo "数据库连接成功";
}else{
		echo "数据库连接失败";
}
打开localhost,成功!